Jeremy Fletcher
I put together a Worsley Works 4mm etch set of the CIE G-class 0-4-0 diesel for Jim Edgar (“Jim Markle”) who required one for his intended ‘OO’ Irish branch line. The etch set arrived in the usual flat envelope containing the sections laid out on etch ‘frets’. Resin spring/axle box dummy castings were provided. A nickel silver fold down ‘basic etch’ piece was provided to make the drive/gearbox. No motor, gears or wheels were provided and it is necessary for the modeller to arrange his/her own. There are no instructions supplied with the Worsley Works etch sets and it is a good idea for the intending model builder to first study the various parts and decide on the most appropriate procedure to follow. It is a good idea to have as many as possible prototype photographs at this stage. The G-class kit is one of the more straightforward Worsley Works sets to assemble as there are few complicated double curvatures, although the need for a drive might deter some people. It provides a good introduction to making etched brass models.
Soldering is of course involved in putting the parts together and this may be off-putting to some. It is not really that hard once you take the initial plunge and get used to it. As this particular model is of a powered locomotive it is advisable at an early stage to decide what sort of drive will be used and how much of the floor must be cut out to give clearance for it. It is easiest to cut out parts from the etchings before starting the assembly. Cutting them out later can be very difficult and frustrating. I found it easiest to put the G-class together in a series of sub assemblies: cab, bonnet, main frame and the drive/gearbox assembly. The upper cab and bonnet are soldered together on the main frame and the drive/gearbox is screwed in place to allow removal for maintenance and oiling. The cab roof is not soldered on until the cab is soldered in place.

I started by making the main frame sub-assembly out of the footplate and end and side plates, basically ending up with an open bottomed box. I first cut out the footplate sheet inside the bonnet area to accommodate the motor I intended to use and also most of the cab floor, being careful to leave enough for soldering on the cab. It is necessary to be careful when cutting out any etching sheet as any stretching of the metal will make it very hard to keep it flat afterward. It is probably best to drill a series of close-spaced small holes alongside each cut line, break out the piece that is to be removed and then finish off the edges with a fine file.

There are pre-drilled holes to locate the buffers and I enlarged these to suit the buffers which I made myself. There are also suitable commercial ones available, such as Markits The footplate underside is provided with etched grooves (like those for fold up locations) to locate both the end and side plates. I first laid the footplate upside down on a flat surface so that it would not distort when being soldered. I located the end plates in the grooves and held them square to the footplate while running a bead of solder along the join. I then did the same with the side plates and then soldered the end plates and side plates together. The side plates also have etched grooves which should be lined up with corresponding ones on the footplate underside. These are to locate the four triangular side gussets which are soldered on afterwards. I checked that the main frame assembly was true and square before going further.
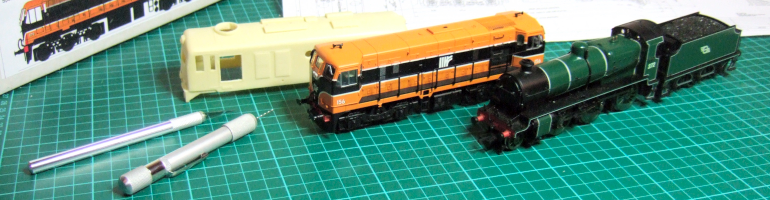
I next made the cab body by folding around the one piece wall etching to make an open top box. There are multiple parallel fold lines at each corner to produce curved corners. I bent the metal around a piece of 7/64” rod to produce even bends. The etch piece edges join between the cab front windows. This joint line will be conveniently hidden by the exhaust stack. I found that some of the cab window edges which are close to the bends buckled during the bending but were easy to straighten again. The bottoms of the cab walls have locating tabs which engage with slots in the footplate section. I checked that the cab fitted properly and soldered it in place.
I made the bonnet section by bending the one piece etch sheet similarly to the cab. It also has the multiple fold lines to give curved corners although the curved bonnet top has to be bent to look like the photos. There are outlines on the footplate and cab front to help in getting the shape of the bonnet section right. The most tedious parts of the bonnet section were the side access door frames and shallow pyramid shape panels. The panels came flat, with fold lines to allow them to be carefully bent to shape. The wire lifting handles on the doors, when inserted in their holes were useful to locate the doors in their correct positions. I made and soldered in place the handrails for the cab and bonnet sections before going any further. Ideally I should have used commercial handrail knobs to hold them but could not find any short enough and the handrails would have stood out unrealistically, so I simply bent and inserted the ends of the .019” wire into the pre-drilled holes. I also made and soldered in the dummy front and rear marker lights, engine air inlet ‘mushrooms’, sand boxes and the exhaust stack. I made hand grabs at the front steps from pins.
I fitted the bonnet section in front of the cab, using the outlines as a guide, and soldered it in position. I then bent the cab roof to shape and soldered it on. I made the front curved section over the “radiator” grille by filing from plastic which was glued in place after the soldering was all done: of course, there is no actual radiator as the prototype was powered by a Deutz air cooled engine.
I made the drive/gearbox from the basic etch sheet provided, with the axle holes already in place. It was designed with fold down sides to make a box shape for the gearbox. The drive/gearbox carries the axles (inside bearings) and the external axle box details are non functional. I found that the gearbox had been designed to suit the P4 ‘Irish’ track gauge and was too wide to fit between wheels set at ‘OO’. I therefore cut off the sides at the fold lines and soldered them back in position closer together. As the loco is so small and light it would be barely capable of moving anything with only one axle driven and I therefore made a drive to both axles by means of a gear train, with the motor lying horizontally along the top of the gearbox, inside the bonnet. I used NWSL 72DP brass gears with an overall speed reduction of 32:1. The wheels are salvaged from a previous re-powering project. There was just enough room above the motor in the bonnet for a couple of stick-in lead weights to help traction in this tiny locomotive. I have not painted the finished locomotive as Jim Edgar wanted to do that himself.
I put together a Worsley Works 4mm etch set of the CIE G-class 0-4-0 diesel for Jim Edgar (“Jim Markle”) who required one for his intended ‘OO’ Irish branch line. The etch set arrived in the usual flat envelope containing the sections laid out on etch ‘frets’. Resin spring/axle box dummy castings were provided. A nickel silver fold down ‘basic etch’ piece was provided to make the drive/gearbox. No motor, gears or wheels were provided and it is necessary for the modeller to arrange his/her own. There are no instructions supplied with the Worsley Works etch sets and it is a good idea for the intending model builder to first study the various parts and decide on the most appropriate procedure to follow. It is a good idea to have as many as possible prototype photographs at this stage. The G-class kit is one of the more straightforward Worsley Works sets to assemble as there are few complicated double curvatures, although the need for a drive might deter some people. It provides a good introduction to making etched brass models.
Soldering is of course involved in putting the parts together and this may be off-putting to some. It is not really that hard once you take the initial plunge and get used to it. As this particular model is of a powered locomotive it is advisable at an early stage to decide what sort of drive will be used and how much of the floor must be cut out to give clearance for it. It is easiest to cut out parts from the etchings before starting the assembly. Cutting them out later can be very difficult and frustrating. I found it easiest to put the G-class together in a series of sub assemblies: cab, bonnet, main frame and the drive/gearbox assembly. The upper cab and bonnet are soldered together on the main frame and the drive/gearbox is screwed in place to allow removal for maintenance and oiling. The cab roof is not soldered on until the cab is soldered in place.
I started by making the main frame sub-assembly out of the footplate and end and side plates, basically ending up with an open bottomed box. I first cut out the footplate sheet inside the bonnet area to accommodate the motor I intended to use and also most of the cab floor, being careful to leave enough for soldering on the cab. It is necessary to be careful when cutting out any etching sheet as any stretching of the metal will make it very hard to keep it flat afterward. It is probably best to drill a series of close-spaced small holes alongside each cut line, break out the piece that is to be removed and then finish off the edges with a fine file.
There are pre-drilled holes to locate the buffers and I enlarged these to suit the buffers which I made myself. There are also suitable commercial ones available, such as Markits The footplate underside is provided with etched grooves (like those for fold up locations) to locate both the end and side plates. I first laid the footplate upside down on a flat surface so that it would not distort when being soldered. I located the end plates in the grooves and held them square to the footplate while running a bead of solder along the join. I then did the same with the side plates and then soldered the end plates and side plates together. The side plates also have etched grooves which should be lined up with corresponding ones on the footplate underside. These are to locate the four triangular side gussets which are soldered on afterwards. I checked that the main frame assembly was true and square before going further.
I next made the cab body by folding around the one piece wall etching to make an open top box. There are multiple parallel fold lines at each corner to produce curved corners. I bent the metal around a piece of 7/64” rod to produce even bends. The etch piece edges join between the cab front windows. This joint line will be conveniently hidden by the exhaust stack. I found that some of the cab window edges which are close to the bends buckled during the bending but were easy to straighten again. The bottoms of the cab walls have locating tabs which engage with slots in the footplate section. I checked that the cab fitted properly and soldered it in place.
I made the bonnet section by bending the one piece etch sheet similarly to the cab. It also has the multiple fold lines to give curved corners although the curved bonnet top has to be bent to look like the photos. There are outlines on the footplate and cab front to help in getting the shape of the bonnet section right. The most tedious parts of the bonnet section were the side access door frames and shallow pyramid shape panels. The panels came flat, with fold lines to allow them to be carefully bent to shape. The wire lifting handles on the doors, when inserted in their holes were useful to locate the doors in their correct positions. I made and soldered in place the handrails for the cab and bonnet sections before going any further. Ideally I should have used commercial handrail knobs to hold them but could not find any short enough and the handrails would have stood out unrealistically, so I simply bent and inserted the ends of the .019” wire into the pre-drilled holes. I also made and soldered in the dummy front and rear marker lights, engine air inlet ‘mushrooms’, sand boxes and the exhaust stack. I made hand grabs at the front steps from pins.
I fitted the bonnet section in front of the cab, using the outlines as a guide, and soldered it in position. I then bent the cab roof to shape and soldered it on. I made the front curved section over the “radiator” grille by filing from plastic which was glued in place after the soldering was all done: of course, there is no actual radiator as the prototype was powered by a Deutz air cooled engine.

I made the drive/gearbox from the basic etch sheet provided, with the axle holes already in place. It was designed with fold down sides to make a box shape for the gearbox. The drive/gearbox carries the axles (inside bearings) and the external axle box details are non functional. I found that the gearbox had been designed to suit the P4 ‘Irish’ track gauge and was too wide to fit between wheels set at ‘OO’. I therefore cut off the sides at the fold lines and soldered them back in position closer together. As the loco is so small and light it would be barely capable of moving anything with only one axle driven and I therefore made a drive to both axles by means of a gear train, with the motor lying horizontally along the top of the gearbox, inside the bonnet. I used NWSL 72DP brass gears with an overall speed reduction of 32:1. The wheels are salvaged from a previous re-powering project. There was just enough room above the motor in the bonnet for a couple of stick-in lead weights to help traction in this tiny locomotive. I have not painted the finished locomotive as Jim Edgar wanted to do that himself.
 is the Alphagraphix/Inscalemodels combination")


 VS class No. 210")
 SG3")


You must be logged in to post a comment.