Tag Archives: 21mm

Converting the Murphy-Bachmann 141 Class Diesel to 21mm Gauge

Denis Bates


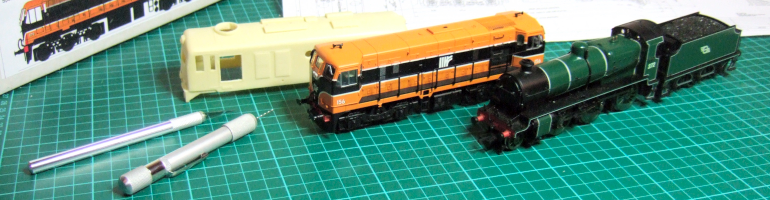
The General Motors 141 Class diesel of CIE was introduced in 1962, and for over 40 years has been among the most successful of the Irish diesels.  So it was not by accident that Murphy Models chose it for their first foray into a completely designed Irish model (the previous Woolwich Mogul and the NCC Jinty were of course repainted versions of the English models).  So, although my main interests are in steam days, and particularly the BCDR, I couldn’t resist purchasing one, with a view to re-wheeling it to 21mm gauge and P4 standards.  The prototype is described and drawn in two of the model magazines: by Tim Cramer in Model Railways for March 1977, and by Shane McQuillan in Practical Model Railways for June 1986. The latter article describes also the building of one, from a kit by the Model Irish Railways group. Comparing the Murphy model with the drawings, I could find nothing amiss – except for the buffer spacing. The buffer centres should be at a spacing of 6’3”; on the model they are at 23mm (5’9”). I presume that is to match the spacing of other Murphy-Bachmann models, at English spacing.

I first determined that a P4 wheelset would fit between the bogie frames, and it does, just. My main mistake was to dismantle the loco as far as possible – this is not necessary, as the bogie frames can be levered off. They are similar to those of the Bachmann Class 20 diesel (described by Keith Norgrove at http://www.norgrove.me.uk/index.htm). A screwdriver is used to prise out the frames, which appear to be identical on the two bogies. The wheelsets can then be prised out of the bogies. Each wheelset has an offset plastic gear wheel, two brass bearings which are a push fit in the sideframes, and brass wheels with insulating sleeves. Measure the distance of the gear from the ends of the axles, before tapping out the wheels and sleeves using a small drift and hammer. The gear wheel can similarly be tapped off the axle.

If the model is to be converted to EM gauge, all that is necessary is to cut 2mm steel rod to the appropriate length, and put the gear and wheels on. Although there is a spline on the original axle for the gear, it seems tight enough on a plain rod (a smear of loctite could be used to anchor it firmly). To keep the axle laterally in place, two brass sleeves, or an appropriate number of washers, should be added between the gear and the bearings (or between the bearings and the insulating sleeves (see figure). For conversion to P4 and 21mm, the original brass wheels can be used, but have to be turned down to receive P4 rims (these are obtainable from Alan Gibson on special order). It is also possible to turn down the existing rims to P4 standards. For those without a lathe, it may be possible to purchase P4 wheels to suit. Before finally inserting the wheel sets, the pickups need to be adjusted so that they bear on the backs of the wheels. On the Bachmann wheelsets, the hub projects further out than the rim, and does not fit easily between the sideframes. However, the insides of the frames can be filed out (about 0.5mm or more) to give clearance. I used a cylindrical dental burr to do this, held in a drill press, and hand held the frames. Once finished, the loco ran just as well as it had done on 00 track. Now to try it on Adavoyle Junction, out of period though it be!

Advertisement

3 Comments

Filed under Modelling

Something New; Something Old

David Malone


Several modellers have had a go at fitting sound chips into the Bachmann-Murphy 141 although some seem to be using slightly larger speakers than I did. To replace the unusable round one supplied. I did no filing, just snipped the corners off the oblong speaker’s plastic frame, and soldered the wires from the cut off speaker to the new one. I did not know that there were speaker terminals on the lights board. I have fitted my two, black 141 and 181, with Ultrascale wheels, to 21mm gauge. The wheels are intended for the BR “Western” class, and feature protruding hubs. I removed these using a chisel shaped hobby blade, wider than the tyre diameter. They can then be shaved off, using the outer tyre face as a limit stop, a few minutes work per wheel. I had to reduce the supplied axles length by 0.75mm.  The little gear wheel sits on a splined bit of the axle, and slides on the 2mm axle, but a touch of Locktite is all that is needed to secure it. I made the mistake of mounting the gear central on the axle, it should be slightly off set to fully engage the gear in the bogie, I will tweak mine over.  The pick up phosphor-bronze strips need bending out to touch the back of the wheels, and act as a side control spring. Now came the big test, would it run? It worked fine on my 3’ length of straight track, but what about my 5’ length, with a reverse curve 4’ 6” into 4’radius, with rail depression in excess of 1mm staggered in the curve: how would the rigid axles cope? Well, much to my pleasant surprise, they stayed on the track, no problem. Since then I decided to file about 0.5mm off the inside of the side-frames, just to provide a little extra clearance, and reduce the chance of the paint on the wheel disc wearing away.  Looking at the removed wheels, I think the protruding rim of the tyre could be turned off until the tyre is scale width, and then the flange could be turned down to P4 or EM profile, thus avoiding a twelve week wait and the expense of Ultrascale wheels.

Treated and untreated bogies. The untreated one is my CIE Supertrain liveried 181

Treated and untreated bogies. The untreated one is my CIE Supertrain liveried 181

Two versions of the 141 on 2mm gauge track

Two versions of the 141 on 2mm gauge track

I am now doing a bit of weathering on my 141/181s. I overdid the exhaust staining on the roof of the orange one, fortunately using acrylic so it washes off. On the sound chipped ones, I removed the grey bridging plate, and turned the speakers over, so they are face down into the
flywheel void, thus creating a sound box. It does seem louder, even with the hearing aids turned off. A dab of black acrylic on the silver speaker back makes them all but invisible through the grill. The next job is to fit all the plumbing to the “Pilot”, and try to combine the very neat etched coupling links with Exactoscale bits to form a strong coupling. The supplied ones are extremely neat, but I don’t think the little plastic pins would last long in service.

The J15 is finished, at last. I started it in 2006, having had the kit since 1985!!!  I found that the tender spring hangers that I mentioned were on the fret all the time. I thought they were the loops that some tenders had around the springs. A case of read the instructions.  In the RAF and civil aviation, the instructors always gave advice before you went into any written exam: “Read the d*** questions!”  Translated into model building this becomes: “Read the d*** instructions!”

J15 on 21mm gauge track

J15 on 21mm gauge track

3 Comments

Filed under Modelling